When a new lead enters your CRM, you want to assign it to one of your sales reps.
Very quickly, if you don't have HubSpot's Sales Hub Pro, you realize that HubSpot is quite limited in this area. You have two main choices:
- Manually assign a lead when it arrives in your CRM or is qualified:
This option is very limiting when looking for speed of execution in contacting a new lead and can be restrictive for the person in charge of the assignment.
- Automatically assign leads based on their properties:
To take a simple example, if you have a French-speaking salesperson and another English-speaking one, you can create a basic attribution workflow redirecting French leads to the first salesperson and the others to the second.
This option is limiting if you are not able to divide your base equally according to your sales reps (for example, if you have two French-Speaking sales reps).
As you might have understood, these two solutions are not optimal and push you to switch to the pro version of the Sales Hub which offers a Workflow action “Rotate record to owner” allowing you to automatically and fairly distribute incoming leads to previously defined HubSpot users (or teams).
In this article, we will see together how to reproduce this feature by hand without having to upgrade your HubSpot subscription!
In practice, we are going to use the “Record ID” property generated randomly by HubSpot for each new contact to create a random distribution system (which we can weight) that will allow us not only to automate our lead assignment, but to randomize any action in our workflows!
Summary
- Prerequisites
- Preparations
- Create the randomization system with the property: “Record ID Recopy Random”
- Define HubSpot users or teams to include in this attribution workflow and the desired weighting.
- Workflow
- Endnotes
Prerequisites
To complete this workflow you will need:
- At least one Pro HubSpot offer: Marketing/Sales/Operations/Services (required for creating Workflows).
- The native HubSpot “Record ID” property.
- A “Record ID Recopy Random” recopy property that we will create together.
- The list of HubSpot users affected by the lead assignment.
To illustrate this automation, we are going to create an automated and weighted assignment workflow assigning our new qualified leads to 3 HubSpot users:
- The first one will receive 70% of the leads
- The second one will receive 20% of the leads
- The third one will receive 10% of the leads
Preparations
Create the randomization system with the property: “Record ID Recopy Random”
How does it works ?
Each contact entering your CRM is assigned a randomly generated number serving as a unique identifier on your CRM called “Record ID”
As this number is randomly generated, according to the law of averages, on a large sample of leads, we will have an equal distribution of the last digits used by this number:
- 10% of leads will have the last digit of their Record ID: 0
- 10% of leads will have the last digit of their Record ID: 1
- 10% of leads will have the last digit of their Record ID: 2
- 10% of leads will have the last digit of their Record ID: 3
- Etc.
We will therefore use the last digit of this number to distribute our leads to one user or another.
- Ex: if last digit = 0, 1, 2, 3 or 4 → Redirect to User A
- Ex: if last digit = 5, 6, 7, 8 or 9 → Redirect to User B
The problem is that the native “Record ID” property is a “number” property, so we can't filter our data by “ends with any of”.
To do this, we must copy this value to a “single line text” property. Indeed, the “single line text” properties allow us to filter them by their last characters.
Just create a “Single Line Text” property named “Record ID Recopy Random”.

To start populating this data, you just need to create a contact-based workflow with “Record ID” triggers is known.
Add a “Copy property value” step: “Record ID” → Contact Property → “Record ID Recopy Random”.
By clicking on publish and choosing “include all existing leads, you will have a way to apply this randomization to all your existing leads and new entrants.
Define the HubSpot users or teams to include in this attribution workflow and the desired weighting.
In our case we will use three users HubSpot tests with the following weighting:
- test1 : 70% of incoming leads
- test2 : 20% of incoming leads
- test3: 10% of incoming leads

Define these parameters upstream before creating the workflow.

Workflow
Create the Workflow
When creating a workflow, you will be able to define its “nature” via three options:
- From scratch or from a template
- The type of workflow (based on contacts, companies, deals etc.)
- The starting conditions (empty Workflow, from a date, a date property etc.)
In the case of our Workflow, we will choose: From scratch, based on *The type of object you want to perform the assignment* (here Contacts) starting from an empty workflow.
Enrollment triggers
The enrollment triggers will depend on which leads you want to assign to your HubSpot users. Depending on your strategy, this may be all your leads (select: Create date = Known), or qualified leads (our example), or any other filtering thought out upstream according to the structure of your sales journey.
In our case, we are going to enroll in this attribution workflow, all leads having a lifecycle stage = Marketing Qualified Lead
Re-enrollment is not necessary for this workflow as the result will be the same for each completion of the workflow.
Workflow building
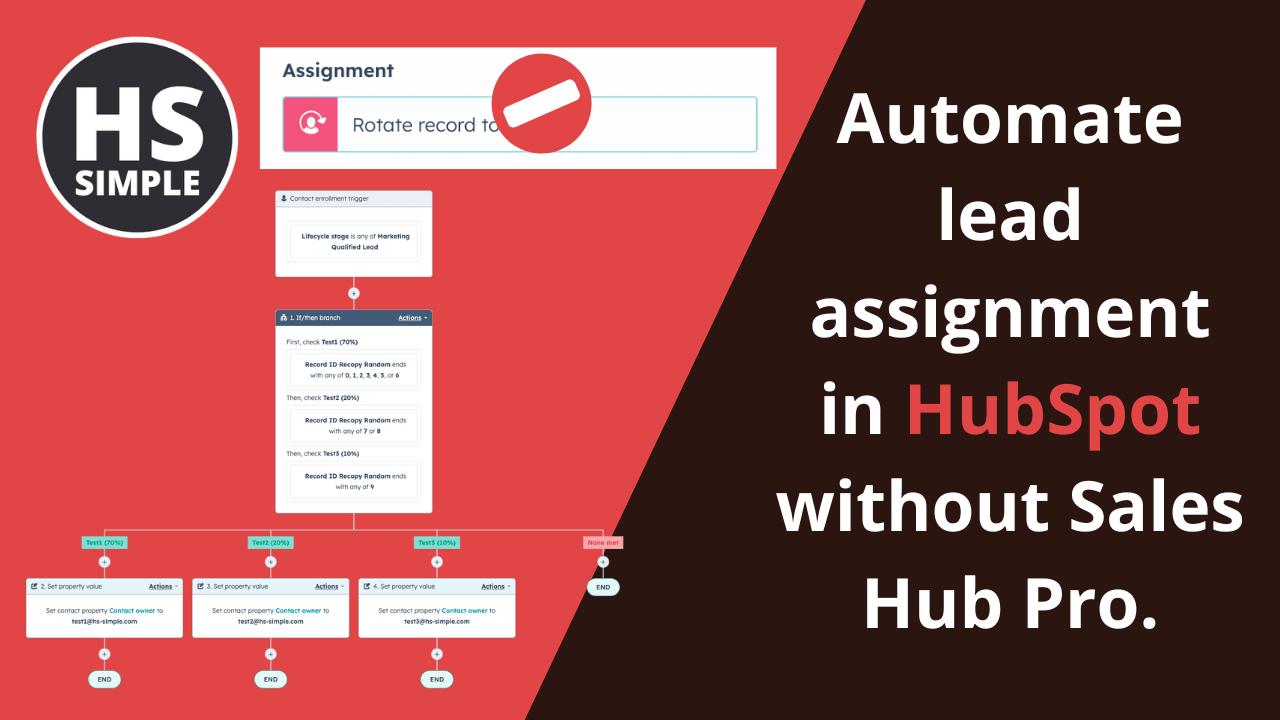
The first step is to create if/then branches.
Click on “add a step” and choose “If/Then Branches”.

Then, create a branch per defined user (in our case 3 users):
Each branch is composed of the filter: “Record ID Recopy Random” → ends with any of: Insert the number of digits corresponding to your weighting.
In our example, Test1 should receive 70% of the leads. There are 10 “last digit” possibilities for this property, so 7 digits must be inserted in the filtering.
This would give a “Test 1” branch as shown below:
Repeat this operation for each of your users, making sure that all the digits are present under at least one of the branches (if you need more combinations, feel free to filter by the last two digits).
You will get a result similar to this:
All you have to do is assign the relevant user under each branch.
To do this, click on “add a new step” → “Define the value of a property”
Choose: Contact owner is: Name of the defined user

Repeat the operation under each branch.
There you go, your automated and fair attribution workflow is ready to be published!
Publishing
Click on Publish.
WARNING ! This workflow can be retroactive, if you click on “yes, register all contacts meeting the triggers criteria”, you will redefine the owners of all your leads. It is advisable to click on “No” if you already have an activity and contacts assigned beforehand!
Endnotes
If you want to find all the workflows created and presented by HS Simple, do not hesitate to request your free access to the workflow box. A private web page listing all the workflows requested by the community with a video explanation and a simple action plan in the form of a “to-do list”.

Comments