While browsing through your HubSpot portal, you must have noticed a HubSpot native that seems to be particularly important: the “Lifecycle Stage”.
This property could not, until very recently, be changed to match the custom needs of your business. But, what is it for?
The lifecycle of a lead corresponds to the whole journey that he will make in your sales process and goes from Subscriber (a person registered with your newsletter) to Evangelist (a satisfied customer who recommends your services to his peers .
Its use within your portal is mainly analytical. It allows you to visualize the position of each lead in your sales process and to be able to build conversion funnel reports in order to estimate the health of your process and the relevance of this or that campaign.
To take full advantage of this feature, you will need to define your lifecycle stages in advance and automate the transition from one stage to another.
Summary
Prerequisites
In order to carry out these workflows you will need:
- At least one Pro HubSpot offer: Marketing/Sales/Operations/Services (required for creating Workflows).
- Define your lifecycle stages.
To illustrate this automation, we will focus on a lifecycle in 4 stages: Lead / Marketing Qualified Lead (MQL) / Sales Qualified Lead (SQL) / Customer.
Lead : Any incoming lead on our CRM
MQL : Any lead with a phone number who is considered a decision maker regarding the purchase of our product
SQL : Any lead who has booked a phone meeting
Customer : Any lead who purchased our product
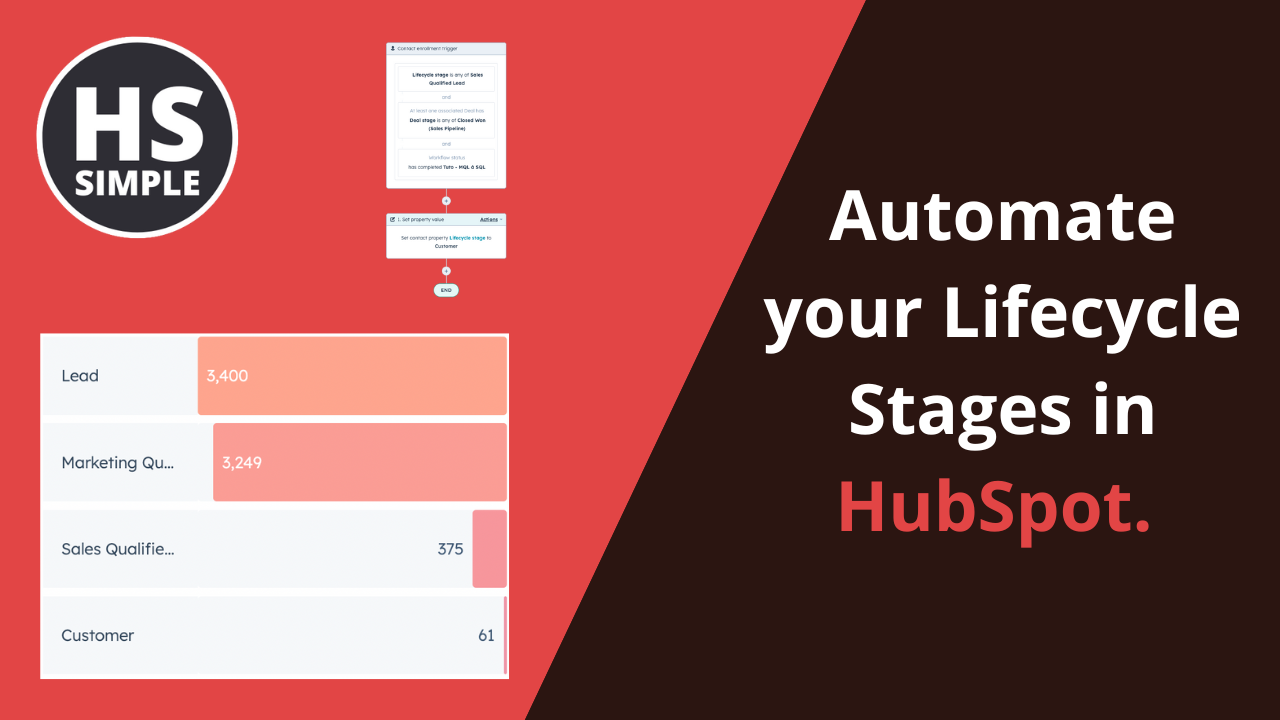
The goal is to have a report that looks like this:

Preparation
Clearly define your lifecycle stages
If you are unfamiliar with the different native lifecycle stages offered by HubSpot, you can read this article.
By going to Settings → Objects → Contacts → Lifecycle Stage, you will be able to view your existing stages and make your changes if needed.

The different stages are presented in their order of execution. A well-configured lifecycle should take your leads through each selected stage in that exact order.
Ask yourself the following questions:
- How do I segment my leads’ buying journey into several stages? (Properties? Lead Scoring? Engagement?)
- Do the HubSpot native stages represent these different stages well?
- If not, which should I add?
Most of the time, those different stages will be sufficient. Note that you don’t have to use them all (if “Subscriber” or “Evangelist” is of no interest to you, you can leave them there and omit them from your reports). As a reminder, in our case, we will only use four.
To rename or delete a stage, click on the corresponding buttons.
To add a new stage, click on “Add a stage” at the bottom of the list.
Define the order of your stages using a “drag and drop”.
Lifecycle automations native to HubSpot
HubSpot offers to automate three stage transitions.
- One based on object creation (Contact or Company)
- One based on creating a transaction
- One based on won deals.

This is not enough to automate our entire lifecycle and these automations may conflict with those we will create together. It is therefore advisable to deactivate automations 2 and 3 and keep only the first linked to the creation of an object.

The Workflows
Create Workflows
We will create one Workflow per stage of your lifecycle to update. Let's start with the first one: from “Lead” to “MQL”.
Choose "From Scratch".
For this Workflow, you can choose between contact-based and company-based. The choice depends on the type of object to qualify (in our case “Contact”).
Choose "Empty Workflow".
Enrollment Triggers
The registration criteria will depend on two things, the stage of your life cycle and the criteria to achieve it.
In the definition of the criteria, the following conditions must be indicated:
- Life cycle stage is *Previous stage*
- Indicate the criteria necessary for the update of this stage
- Contact has completed the Workflow *Previous stage* (if applicable)
- Clone these criteria and add all the criteria of the following stages (one clone per criterion to separate these criteria by “Or”)
In our case :
- Lead to MQL
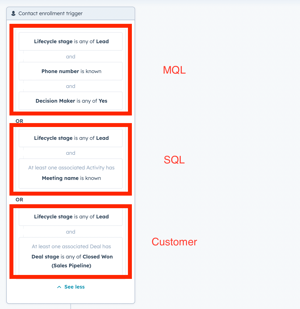
- From MQL to SQL

Why add the criteria of the following stages and wait for the lead to complete the previous workflow?
To ensure that a lead buying our product without making an appointment, for example, virtually goes through all the stages of the lifecycle and is clearly visible in our final reports.
We don't want a lead to be re-enrolled in our lifecycle workflows so we don't skew our reports. Be sure not to enable re-enrollment.
Workflows Building
The workflow is based on a single step. Set the Lifecycle stage property to the corresponding stage.
Click on add a step → set the value of a property → Lifecycle stage → Select the corresponding stage.

Publishing
Click Publish.
This workflow can be retroactive depending on whether you want to redefine the lifecycle of your entire contact database. Make your choice and select the corresponding option.
Be careful, HubSpot native timestamp properties related to the evolution of the lifecycle will also be updated.
Build a funnel report of your lifecycle
Go to the “Reports” tab and click on “Reports”.
Create a new report and select “Funnels”.
Enter the different stages you want to display.
Notes :
- Be careful to only add the stages defined upstream
- Pay attention to the order of those stages
- You can add additional filters to customize your reports

And voila, you will get a funnel report like this:
Endnotes:
If you want to find all the workflows created and presented by HS Simple, do not hesitate to request your free access to the workflow box. A private web page listing all the workflows requested by the community with a video explanation and a simple action plan in the form of a “to-do list”.

Comments